Translate

Chủ Nhật, 28 tháng 3, 2021

08. Chọn nhiều hàng vào đơn hàng


Bài 08: Chọn nhiều hàng vào đơn hàng

Nội dung:

  1. Tạo OrderItemViewController
  2. Tạo PopupWindowShowAction để chọn Products_ListView
  3. Thêm hàng hóa đã chọn vào đơn hàng
  4. Hiển thị Products_ListView dưới dạng chọn CheckBox
  5. Chạy thử với phiên bản web, blazor

1. Tạo ViewController cho OrderItem


using App.Module.Modules.Inventory.Entities;
using DevExpress.ExpressApp;
using DevExpress.ExpressApp.Actions;
using System;
using System.Linq;
using YouSoft.Vn.XAFCustom.Supports.Extensions;

namespace App.Module.Modules.Sales
{
    public class OrderItemViewController : ViewController<ListView>
    {
        PopupWindowShowAction selectProductsAction;
        public OrderItemViewController()
        {
            TargetObjectType = typeof(OrderItem);
            TargetViewNesting = Nesting.Nested;
            selectProductsAction = new PopupWindowShowAction()
            {
                Id = nameof(selectProductsAction),
                Caption = "Chọn hàng",
                TargetObjectType = typeof(OrderItem),
                TargetViewNesting = Nesting.Nested,
                SelectionDependencyType=SelectionDependencyType.Independent
            };

            Actions.Add(selectProductsAction);
            selectProductsAction.CustomizePopupWindowParams += SelectProductsAction_CustomizePopupWindowParams;
            selectProductsAction.Execute += SelectProductsAction_Execute;
        }

        private void SelectProductsAction_Execute(object sender, PopupWindowShowActionExecuteEventArgs e)
        {
            if (View.GetRawMasterObject() is SalesOrder order)
            {
                var products = e.PopupWindowViewSelectedObjects
                    .Cast<Product>()
                    .ToList();
                foreach(var product in products)
                {
                    order.Add(product);
                }
            }
        }

        private void SelectProductsAction_CustomizePopupWindowParams(object sender, CustomizePopupWindowParamsEventArgs e)
        {
            e.SetListView<Product>("", false, false);
        }
    }
}

2. Thêm hàm Add product vào lớp SalesOrder

public void Add(Product product, double quantity = 1) { var item =OrderItems.FirstOrDefault(i => i.Product == product); if (item == null) { item = new OrderItem(Session) { Product = Session.CloneObject(product) }; OrderItems.Add(item); } item.Quantity += quantity; }
Kiểm tra kết quả

3. Trong windows, hiển thị list view với checkbox cho user chọn

3.1 Clone Product_ListView 

Sửa các thuộc tính như trong hình

3.2 Đăng ký trong App.Module.cs


  protected override void Register(ICheckboxListViewService service)
        {
            base.Register(service);
            service.Register("Product_ListView_Popup");
        }

3.3 Thay chuỗi rỗng ở trên thành View Id

 private void SelectProductsAction_CustomizePopupWindowParams(object sender, CustomizePopupWindowParamsEventArgs e)
        {
            e.SetListView<Product>("Product_ListView_Popup", false, false);
        }

4. Kiểm tra kết quả


Chúc các bạn thành công!

Bài 7: Thêm trạng thái cho đơn hàng (Enum)

Bài 7: Thêm trạng thái cho đơn hàng (Enum)

Bài trước chúng, ta đã có đơn hàng Sales Order, lần này chúng ta sẽ thực hiện các tác vụ sau:
  1. Thêm trạng thái giao hàng cho đơn hàng (DeliveryStatus), sử dụng enum
  2. Tô màu tương ứng từng trạng thái sử dụng Conditional Appearance Module của XAF
    1. Chỉnh sửa trên model
    2. Viết trong code
  3. Dùng SingleChoiceAction để tạo action cho người dùng sửa trạng thái hàng loạt đơn hàng:
    1. Đọc tất cả giá trị của một kiểu enum
    2. Lấy LocalizedText của một giá trị trong enum
  4. Video tham khảo:
Chúng ta bắt đầu nhé.

1. Thêm trạng thái giao hàng cho đơn hàng

Các bạn tạo một enum như bên dưới

using DevExpress.ExpressApp.DC;
using System;
using System.Linq;

namespace App.Module.Modules.Sales
{
    public enum DeliveryStatus
    {
        //CodeRush - Gõ dn khoảng trắng để hiển thị thuộc tính XafDisplayName
[XafDisplayName("")] None = 0, [XafDisplayName("Đã xuất kho")] Exported = 1, [XafDisplayName("Đã giao")] Delivered = 2, [XafDisplayName("Hủy")] Cancelled = 3 } }

2. Thêm property DeliveryStatus


[XafDisplayName("Tình trạng giao hàng")] //[ToolTip("")] public DeliveryStatus DeliveryStatus { get => _deliveryStatus; set => SetPropertyValue(nameof(DeliveryStatus), ref _deliveryStatus, value); }

3. Thay đổi màu sắc theo trạng thái

a. Thay đổi trên model

Bạn nhớ, rebuild để XAF cập nhật lại file ModelDesign nhé. Mở file này, vào mục sau
Cách này dễ làm, nhưng mỗi lần phải định nghĩa màu, có thể gây ra khống nhất màu sắc.

b. Thay đổi trong code

Mở lớp SalesOrder lên, thêm vào thuộc tính màu sắc như bên dưới:


using YouSoft.Vn.XAFCustom.Supports.Attributes.ActionModification; using YouSoft.Vn.XAFCustom.Supports.Custom; namespace App.Module.Modules.Sales { //... [DecoratePropertiesControls("Cancelled",TargetItems =nameof(DeliveryStatus)
,Criteria = "DeliveryStatus='Cancelled'",PredefinedStyle =PredefinedStyle.DangerStyle)] public partial class SalesOrder //... {

4. Kiểm tra


5. Tạo SingleChoiceAction để set status

Thêm đoạn code sau vào file SalesOrderViewController.cs
//... public SalesOrderViewController() { //... setDeliveryStatusAction = new SingleChoiceAction() { Id = nameof(setDeliveryStatusAction), Caption = "Cập nhật", TargetObjectType = typeof(SalesOrder), ConfirmationMessage = "Bạn có muốn cập nhật hàng hoạt đơn hàng không?", ItemType = SingleChoiceActionItemType.ItemIsOperation, SelectionDependencyType=SelectionDependencyType.RequireMultipleObjects }; Actions.Add(setDeliveryStatusAction); InitActionItems(); setDeliveryStatusAction.Execute += SetDeliveryStatusAction_Execute; } void InitActionItems() {     var statuses = Enum.GetValues(typeof(DeliveryStatus)); foreach (var status in statuses) { var item = new ChoiceActionItem(((Enum)status).LocalizedEnumText()
, status); setDeliveryStatusAction.Items.Add(item); } }

6. Kết quả

Chúc các bạn thành công


Thứ Sáu, 26 tháng 3, 2021

Bài 6.b Filter dữ liệu theo thời gian


 Bài 6.b Filter dữ liệu theo thời gian

Thân chào anh em YAFers. Hôm nay, chúng ta sẽ làm nội dung sau: 
Filter SalesOrder theo ngày từ ngày đến ngày.
Nội dung chi tiết các bạn có thể xem clip này nhé.

1. Vì sao cần filter dữ liệu

Trong thế giới thực, dữ liệu bán hàng sẽ lớn dần theo thời gian. Khi bấm vào Sales Order, nó sẽ load tất cả từ cơ sở dữ liệu thì quá lớn, làm chậm phần mềm. Nếu không muốn nói là đóng băng.
Thường khách hàng chỉ muốn xem dữ liệu của một khoảng thời gian gần nhất ví dụ: tuần gần nhất, tháng gần nhất.
Rất may, YAF đã hỗ trợ điều này.

2. Cài đặt số ngày cần xem dữ liệu

Vào cài đặt hệ thống, các bạn điền số ngày cần xem dữ liệu

2. Chỉnh sửa lớp SalesOrder

Mở lớp SalesOrder, implement interface IFilterByDate và gán attribute FilterByDateAttribute như bên dưới:

using YouSoft.Vn.XAFCustom.Supports.Attributes.ActionModification;
using YouSoft.Vn.XAFCustom.Supports.Interfaces;

namespace App.Module.Modules.Sales
{
    
    [FilterByDate(nameof(Date))]
    public partial class SalesOrder : YsvObject,IReportPrintable, IFilterByDate
    {

2. Chạy phần mềm

Chỉ vậy thôi, khi chạy phần mềm các bạn sẽ thấy bộ lọc dữ liệu như bên dưới. 
Chúc các bạn thành công
Nếu có khăn có thể tham khảo Repository Examples (phần liên kết)


Bài 6.a: Export dữ liệu ra file excel

 Bài 6.a: Export dữ liệu ra file excel

Thân chào anh em YAFers. Hôm nay, chúng ta sẽ làm nội dung sau:
  • Xuất dữ liệu hàng hóa (Product) ra file excel theo một mẫu định nghĩa trước.
Nội dung chi tiết các bạn có thể xem clip này nhé.

  1. Xuất dữ liệu hàng hóa (Product) ra file excel theo một mẫu định nghĩa trước

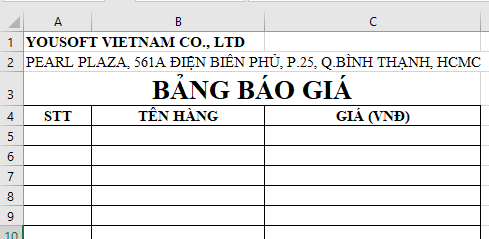
1.1 Định nghĩa mẫu file excel

Đầu tiên, các bạn tạ một file excel trong thư mục ExcelTemplates, có format như sau:

1.2 Tạo lớp Export

Sau đó tạo lớp export như bên dưới.

using DevExpress.ExpressApp;
using DevExpress.Spreadsheet;
using System;
using System.Linq;
using YouSoft.Vn.XAFCustom.Supports.Extensions;
using YouSoft.Vn.XAFCustom.Supports.Interfaces;

namespace App.Module.Modules.Inventory.Entities
{
    public class ProductExcelFiller : IFillDataToExcelTemplate
    {
        public string RelativeFilePath => @"ExcelTemplates\BaoGia.xlsx";

        public string DefaultSavingName => $"{DateTime.Now.ToString("ddMMyyy_HHmm")}_BaoGia.xlsx";

        public Type TargetType => typeof(Product);

        public Nesting TargetNesting => Nesting.Any;

        public ViewType TargetViewType => ViewType.Any;

        public bool FillData(Worksheet sheet, ViewController controller, out string expectedExportFileName)
        {
            expectedExportFileName = DefaultSavingName;
            var products = controller.View.GetSelectedObjects<Product>();
            if (products.Count <= 0)
            {
                products = controller.View.ObjectSpace.GetObjectsQuery<Product>()
                    .ToList();
            }
            var rowIndex = FillingInfo.StartingRow;
            var index = 1;
            foreach(var product in products)
            {
                
                sheet.SetCellValue($"{FillingInfo.STT}{rowIndex}", index.ToString());
                sheet.SetCellValue($"{FillingInfo.Name}{rowIndex}", product.Name);
                sheet.SetCellValue($"{FillingInfo.Price}{rowIndex}", product.Price.ToString("N0"));
                rowIndex++;
                index++;
            }
            return true;
        }
        public class FillingInfo
        {
            public const int StartingRow = 5;
            public const char STT = 'A';
            public const char Name = 'B';
            public const char Price = 'C';
        }
    }
}

1.3 Đăng ký


//file: App.Module.cs
        protected override void Register(IFillDataToExcelTemplateService service)
        {
            base.Register(service);
            service.Register<ProductExcelFiller>();
        }

1.4 Chạy phần mềm


Kết quả sau khi xuất.
Chúc các bạn thành công.


Thứ Năm, 25 tháng 3, 2021

Bài 5: Import hàng hóa từ file excel

 Bài 5: Import hàng hóa từ file excel

Chào các bạn.
Ở bài này chúng ta sẽ import hàng hóa từ một file excel.

1. Tạo file excel mẫu:


2. Tạo lớp ProductImporter


using DevExpress.ExpressApp;
using DevExpress.Spreadsheet;
using System;
using System.Collections.Generic;
using System.Linq;
using YouSoft.Vn.Framework.Core.Extensions;
using YouSoft.Vn.XAFCustom.Supports.Base;
using YouSoft.Vn.XAFCustom.Supports.Extensions;

namespace App.Module.Modules.Inventory.Entities
{
    public class ProductImporter : ExcelImporterBase<Product>
    {
        public override int StaringRowIndex => 2;

        public override string SampleFilePath => @"ExcelTemplates\Products.xlsx";
        List<string> productNames;

        public override bool OnStart(IObjectSpace os, ViewController controller, Workbook workbook)
        {
            base.OnStart(os, controller, workbook);
            productNames = os.GetObjectsQuery<Product>()
                    .Select(p=>p.Name)
                    .ToList();
            return true;
        }

        public override bool OnFinish()
        {
            productNames.Dispose();
            return base.OnFinish();

        }

        public override bool OnRowStart(int rowIndex, ref string error)
        {
            //1. đọc tên hàng hóa
            var name=Sheet.GetCellValueString(Columns.Name, rowIndex);
            name = name?.Trim();
            //2. Nếu tên hàng hóa không rỗng/null và không có trong csdl
            if (!name.IsNullOrWhiteSpace()
                ||!productNames.Contains(name)
                )
            {
                //3. tạo mới hàng hóa
                var price = Sheet.GetCellValue<double>(Columns.Price, rowIndex, 0);
                new Product(Session)
                {
                    //với tên ở trên
                    Name=name,
                    Price=price
                };
                productNames.Add(name);
            }
                
                
                //đọc giá 
            return true;
        }
        public static class Columns
        {
            public const char Name = 'A';
            public const char Price = 'B';
        }
    }
}

Đăng ký lớp ở App.Module.cs

		protected override void Register(IExcelImportService service)
        {
            base.Register(service);
            service.Register<ProductImporter>();
        }
Lưu ý, ở project chạy chương trình, nhớ có file mẫu ở trên.

Chạy chương trình


Các bạn có thể tham khảo chi tiết ở Video hướng dẫn
Có khó khăn gì thì comment bên dưới nhé.

Bài 4: In phiếu bán hàng

 Bài 4: In phiếu bán hàng

Chào các bạn!
Ở bài trước, chúng ta tạo ra phiếu bán hàng (SalesOrder), hôm nay chúng ta tiếp tục in phiếu bán hàng nhé. Chi tiết các bạn tham khảo ở video này

1. Thêm report vào dự án

Bấm chuột phải lên thư mục Sales, chọn Add Devexpress Item>>New Item


Trong cửa sổ Devexpress Template Gallery, Reporting chọn report


Chọn Blank Report. 


2. Design report


Thêm CollectionDataSource vào report


Chỉ định kiểu datasource


3. Đăng ký report

Mở file App.Module.cs
Thêm đoạn code sau để đăng ký:


protected override void Register(IXtraReportService service)
        {
            base.Register(service);
            service.Register<SalesReport>("Phiếu bán hàng",typeof(SalesOrder),true);
        }

4.a Tạo View controller in report

using DevExpress.ExpressApp;
using DevExpress.ExpressApp.Actions;
using System;
using System.Collections.Generic;
using YouSoft.Vn.XAFCustom.Supports.Extensions;
using System.Text;

namespace App.Module.Modules.Sales
{
    public class SalesOrderViewController:ViewController
    {
        SimpleAction printReport;
        public SalesOrderViewController()
        {
            TargetObjectType = typeof(SalesOrder);
            printReport = new SimpleAction() { 
                Id=nameof(printReport),
                Caption="In phiếu",
                TargetObjectType=typeof(SalesOrder)
            };
            Actions.Add(printReport);
            printReport.Execute += PrintReport_Execute;
        }

        private void PrintReport_Execute(object sender, SimpleActionExecuteEventArgs e)
        {
            this.ShowReportForCurrentObject<SalesReport>();
        }
    }
}

Đăng ký Controller

protected override void Register(ModuleControllerService service)
        {
            base.Register(service);
            service.Register<ProductViewController>()
                .Register < SalesOrderViewController>();
        }

Chạy chương trình


4.b Tạo View controller in report

Tới đây bạn đã biết cách hiển thị report từ action như thế nào. Thật tuyệt vời phải không?
Tuy nhiên còn một cách tuyệt vời hơn, bạn không cần phải tạo controller action.
Mở lớp SalesOrder chỉ cần implement interface IReportPrintable như bên dưới là chạy được


using App.Module.Modules.Sales;
using DevExpress.ExpressApp.DC;
using DevExpress.ExpressApp.Model;
using DevExpress.Persistent.Base;
using DevExpress.Xpo;
using ModuleBase.Entities;
using System;
using System.ComponentModel;
using System.Linq;
using YouSoft.Vn.Framework.Core.Utilities;
using YouSoft.Vn.XAFCustom.Core.Entities;
using YouSoft.Vn.XAFCustom.Supports;
using YouSoft.Vn.XAFCustom.Supports.Attributes.Validation;
using YouSoft.Vn.XAFCustom.Supports.Interfaces;

namespace App.Module.Modules.Sales
{
    [XafDisplayName("Đơn hàng")]
    [ImageName("BO_SalesOrder")]
    [VisibleInDashboards]
    [VisibleInReports]
    [LookupEditorMode(LookupEditorMode.AllItemsWithSearch)]
    public partial class SalesOrder : YsvObject,IReportPrintable
    {

        //..............
        [Browsable(false)]
        public bool Printable => true;
        [Browsable(false)]
        public Type ReportType => typeof(SalesReport);
    }
}
Chúc các bạn thành công.

Thứ Hai, 22 tháng 3, 2021

Bài 3: Tạo một đơn hàng bán đơn giản

Bài 3: Tạo một đơn hàng bán đơn giản

Nội dung chính

Tạo module Sales: có các entity chính:
  1. Khách hàng: Mã, tên, địa chỉ
  2. Đơn hàng: Ngày bán, người bán, khách hàng mua, tổng tiền, thành tiền
  3. Chi tiết đơn hàng: Đơn hàng, món hàng, đơn giá, số lượng, thành tiền.
Khi tạo xong chúng ta sẽ có các entity sau:


Lớp khách hàng


using DevExpress.ExpressApp.DC;
using DevExpress.ExpressApp.Model;
using DevExpress.Persistent.Base;
using DevExpress.Persistent.Validation;
using DevExpress.Xpo;
using System.ComponentModel;
using YouSoft.Vn.XAFCustom.Core.Entities;
using YouSoft.Vn.XAFCustom.Core.Extensions;
using YouSoft.Vn.XAFCustom.Supports;
using YouSoft.Vn.XAFCustom.Supports.Attributes.Validation;
using YouSoft.Vn.XAFCustom.Supports.Interfaces;

namespace App.Module.Modules.Sales
{
    [XafDisplayName("Khách hàng")]
    [ImageName("BO_Customer")]
    [VisibleInDashboards]
    [VisibleInReports]
    [LookupEditorMode(LookupEditorMode.AllItemsWithSearch)]
    public partial class Customer : YsvObject, IHasCode
    {

        public Customer(Session session) : base(session)
        {

        }

        string _name;
        [Indexed(Name = @"Idx_Name")]
        [NonCloneable]
        [VisibleInLookupListView(true)]
        [RequiredOnSave]
        [XafDisplayName("Tên khách")]
        //[ToolTip("   ")]
        public string Name
        {
            get =>
                _name;
            set =>
                SetPropertyValue(nameof(Name), ref _name, value);
        }
        protected override string MakeDescription() =>
            Name;


        string _code;
        [Indexed(Name = @"Idx_Code")]
        [Size(30)]
        [DevExpress.Persistent.Base.NonCloneable]
        [XafDisplayName("Mã khách")]
        [ModelDefault(nameof(IModelMember.AllowEdit), CoreApp.Consts.False)]
        //[ToolTip("")]
        [VisibleInLookupListView(true)]
        [RuleUniqueValue("", DefaultContexts.Save,
   CriteriaEvaluationBehavior = CriteriaEvaluationBehavior.BeforeTransaction)]
        public string Code
        {
            get { return _code; }
            set { SetPropertyValue(nameof(Code), ref _code, value); }
        }

        int _sequenceNumber;
        [NonCloneable]
        [Indexed]
        [Browsable(false)]
        public int SequenceNumber
        {
            get =>
                _sequenceNumber;
            set =>
                SetPropertyValue(nameof(SequenceNumber), ref _sequenceNumber, value);
        }
        protected override void OnSavingOnly()
        {
            base.OnSavingOnly();
            Code = this.GenerateCode("KH", 4);
        }
    }
}

Lớp đơn hàng

using App.Module.Modules.Sales;
using DevExpress.ExpressApp.DC;
using DevExpress.ExpressApp.Model;
using DevExpress.Persistent.Base;
using DevExpress.Xpo;
using ModuleBase.Entities;
using System;
using System.Linq;
using YouSoft.Vn.Framework.Core.Utilities;
using YouSoft.Vn.XAFCustom.Core.Entities;
using YouSoft.Vn.XAFCustom.Supports;
using YouSoft.Vn.XAFCustom.Supports.Attributes.Validation;

namespace App.Module.Modules.Inventory
{
    [XafDisplayName("Đơn hàng")]
    [ImageName("BO_SalesOrder")]
    [VisibleInDashboards]
    [VisibleInReports]
    [LookupEditorMode(LookupEditorMode.AllItemsWithSearch)]
    public partial class SalesOrder : YsvObject
    {

        public SalesOrder(Session session) : base(session)
        {

        }
        public override void AfterConstruction()
        {
            base.AfterConstruction();
            Date = DateTime.Now;
            Employee = YsvUser.GetCurrentUser<Employee>(Session);
        }

        private double _total;
        private Customer _customer;
        private Employee _employee;
        private DateTime _date;

        [XafDisplayName("Ngày bán")]
        //[ToolTip("")]
        public DateTime Date
        {
            get => _date;
            set => SetPropertyValue(nameof(Date), ref _date, value);
        }

        [XafDisplayName("Nhân viên")]
        [ModelDefault(nameof(IModelMember.AllowEdit), CoreApp.Consts.False)]
        //[ToolTip("")]
        public Employee Employee
        {
            get => _employee;
            set => SetPropertyValue(nameof(Employee), ref _employee, value);
        }


        [XafDisplayName("Khách hàng")]
        [RequiredOnSave]
        //[ToolTip("")]
        public Customer Customer
        {
            get => _customer;
            set => SetPropertyValue(nameof(Customer), ref _customer, value);
        }

        
        [XafDisplayName("Tiền hàng")]
        [ModelDefault(nameof(IModelMember.DisplayFormat), CoreApp.Consts.N0)]
        [ModelDefault(nameof(IModelMember.EditMask), CoreApp.Consts.N0)]
        [ModelDefault(nameof(IModelMember.AllowEdit), CoreApp.Consts.False)]
        //[ToolTip("")]
        public double Total
        {
            get => _total;
            set => SetPropertyValue(nameof(Total), ref _total, value);
        }

        public string MoneyInWords => CurrencyUtil.ToString(Total);

        [XafDisplayName("Chi tiết hàng")]
        //[ToolTip("")]
        [Association("SalesOrder-OrderItems")]
        public XPCollection<OrderItem> OrderItems
        {
            get
            {
                return GetCollection<OrderItem>(nameof(OrderItems));
            }
        }

        protected override void OnSavingOnly()
        {
            base.OnSavingOnly();
            Total = OrderItems.Sum(i=>i.SubTotal);
        }
    }
}

Lớp đơn hàng chi tiết

using DevExpress.ExpressApp.DC;
using DevExpress.ExpressApp.Model;
using DevExpress.Persistent.Base;
using DevExpress.Xpo;
using YouSoft.Vn.XAFCustom.Core.Entities;
using YouSoft.Vn.XAFCustom.Supports;
using YouSoft.Vn.XAFCustom.Supports.Attributes.Validation;

namespace App.Module.Modules.Inventory
{
    [XafDisplayName("Chi tiết hàng")]
    [ImageName("BO_OrderItem")]
    [VisibleInDashboards]
    [VisibleInReports]
    [LookupEditorMode(LookupEditorMode.AllItemsWithSearch)]
    public partial class OrderItem : YsvObject
    {

        public OrderItem(Session session) : base(session)
        {

        }
        
        [XafDisplayName("")]
        //[ToolTip("")]
        [RequiredOnSave]
        [ModelDefault(nameof(IModelMember.AllowEdit), CoreApp.Consts.False)]
        [Association("SalesOrder-OrderItems")]
        public SalesOrder SalesOrder
        {
            get => _salesOrder;
            set => SetPropertyValue(nameof(SalesOrder), ref _salesOrder, value);
        }

        private SalesOrder _salesOrder;
        private double _subTotal;
        private double _quantity;
        private double _unitPrice;
        private Product _product;

        [XafDisplayName("Món hàng")]
        [RequiredOnSave]
        //[ToolTip("")]
        public Product Product
        {
            get => _product;
            set => SetPropertyValue(nameof(Product), ref _product, value);
        }


        [XafDisplayName("Đơn giá")]
        [ModelDefault(nameof(IModelMember.DisplayFormat), CoreApp.Consts.N0)]
        [ModelDefault(nameof(IModelMember.EditMask), CoreApp.Consts.N0)]
        //[ToolTip("")]
        public double UnitPrice
        {
            get => _unitPrice;
            set => SetPropertyValue(nameof(UnitPrice), ref _unitPrice, value);
        }

        [XafDisplayName("Số lượng")]
        [ModelDefault(nameof(IModelMember.DisplayFormat), CoreApp.Consts.N1)]
        [ModelDefault(nameof(IModelMember.EditMask), CoreApp.Consts.N1)]
        //[ToolTip("")]
        public double Quantity
        {
            get => _quantity;
            set => SetPropertyValue(nameof(Quantity), ref _quantity, value);
        }


        [XafDisplayName("Thành tiền")]
        [ModelDefault(nameof(IModelMember.DisplayFormat), CoreApp.Consts.N0)]
        [ModelDefault(nameof(IModelMember.EditMask), CoreApp.Consts.N0)]
        [ModelDefault(nameof(IModelMember.AllowEdit), CoreApp.Consts.False)]
        //[ToolTip("")]
        public double SubTotal
        {
            get => _subTotal;
            set => SetPropertyValue(nameof(SubTotal), ref _subTotal, value);
        }

        protected override void OnPropertyValueChanged(string propertyName, object oldValue, object newValue)
        {
            base.OnPropertyValueChanged(propertyName, oldValue, newValue);
            switch (propertyName)
            {
                case nameof(Product):
                    UnitPrice = Product?.Price ?? 0;
                    break;
                case nameof(UnitPrice):
                case nameof(Quantity):
                    SubTotal = UnitPrice * Quantity;
                    break;
            }
        }
    }
}

Thứ Bảy, 20 tháng 3, 2021

Bài 2.b: Tạo một action đơn giản

Bài 2.b: Tạo một action đơn giản

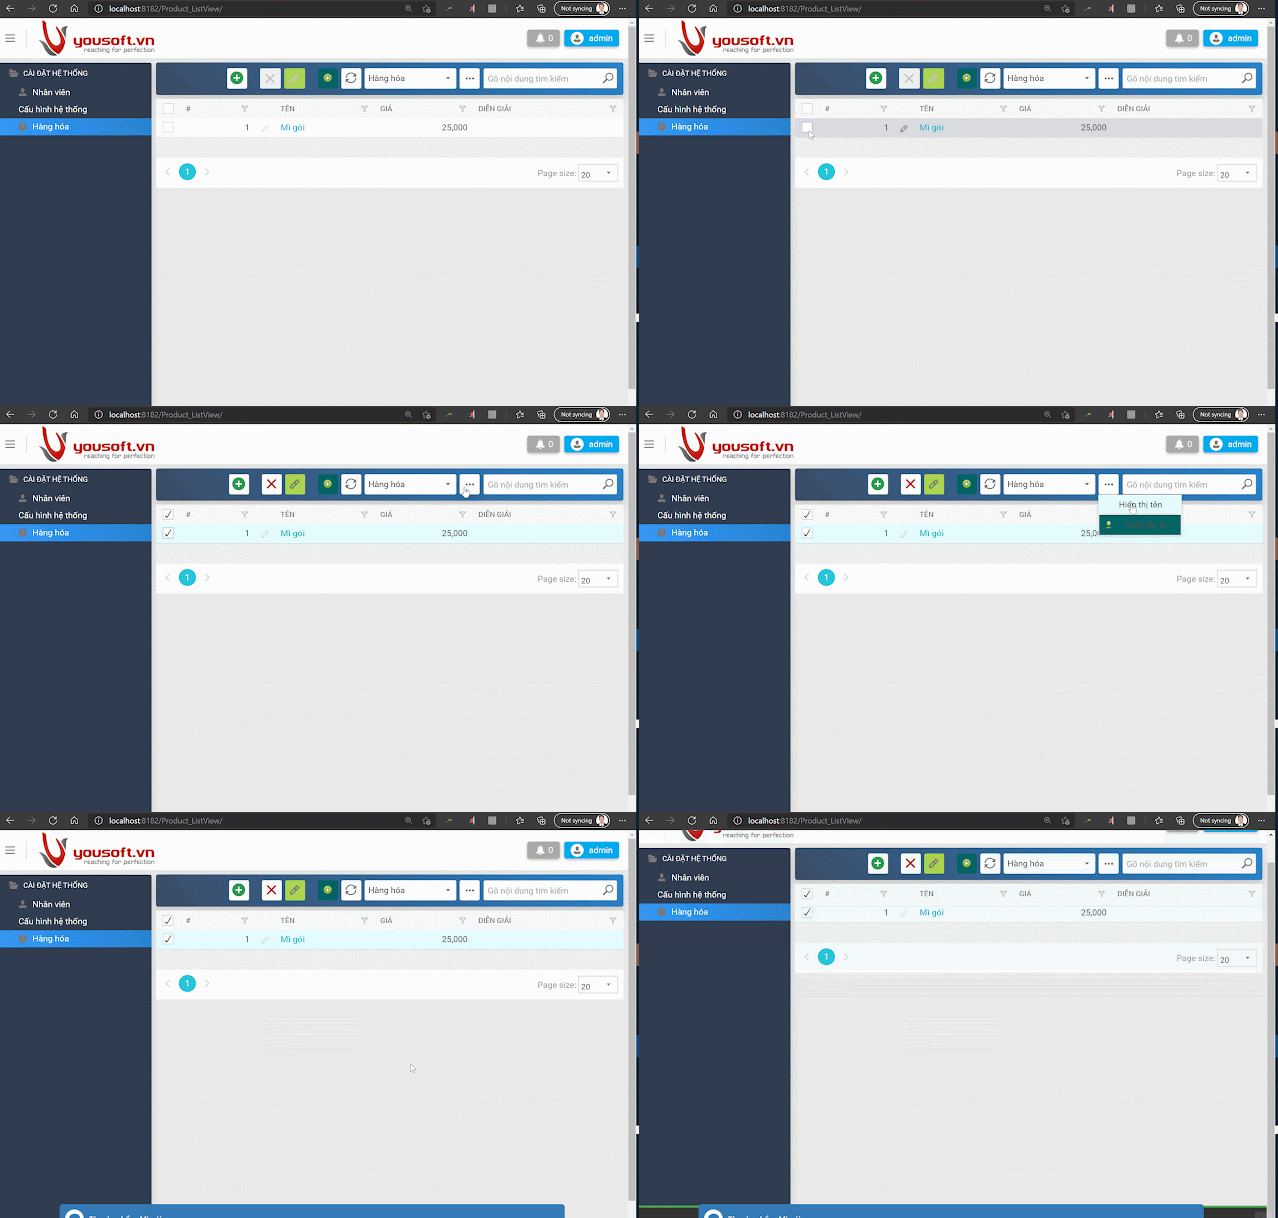
bài trước, các bạn đã thêm lớp Product vào phần mềm. Bài này, tôi sẽ hướng dẫn các bạn tạo một nút lệnh đơn giản (SimpleAction), khi chọn một product bấm vào nó hiển thị tên của sản phẩm đó. 
Đơn giản như đang giỡn, nhưng ai cũng vậy, trước khi chạy mình bò từ từ hén.

Tạo controller

Các nút lệnh tương tác trong phần mềm nền tảng XAF đều thông qua action. Lớp ViewController sẽ chứa các action đó. 
Vì vậy các bạn trước hết tạo một lớp ViewController như sau:

Đơn giản tên lớp là ProductViewController, nên đặt tên đối tượng là lớp nào để dễ maintain sau này.
Lớp này bạn nên đặt vào thư mục Inventory của lần trước. Nếu kỹ nữa thì trong thư mục này nên có thư mục Enitties dành để chứa các lớp như Product và ViewControllers để chứa các viewcontroller. Nhưng thôi ở bước này làm gọn, để tập trung vào ViewController.

Tạo Action

XAF có hỗ trợ tạo designer, các bạn thêm action vào dễ dàng. Tuy nhiên, với các project dùng .netCore framework chưa hỗ trợ desgin. Các bạn có thể tìm hiểu cách này ở tài liệu XAF và làm thử ở solution .net_Guid.
Ở đây, tôi chỉ các bạn tạo action trong code. Tất cả làm trong code hết.
Các bạn tạo đoạn code thế này.
using DevExpress.ExpressApp;
using DevExpress.ExpressApp.Actions;
using System;
using System.Collections.Generic;
using System.Text;
using YouSoft.Vn.XAFCustom.Supports.Extensions;

namespace App.Module.Modules.Inventory
{
    
    public class ProductViewController:ViewController
    {
    	//Khai báo action
        SimpleAction _showNameAction;
        public ProductViewController()
        {
        	//ViewController này chỉ dành cho lớp Product
            TargetObjectType = typeof(Product);
            _showNameAction = new SimpleAction()
            {
            	//Id để nhận diện thôi
                Id = nameof(_showNameAction),
                //action này chỉ hoạt đột trên lớp Product
                TargetObjectType=typeof(Product),
                
                Caption = "Hiển thị tên",
                Category = "View",
                //action chỉ hoạt động khi có một sản phẩm được chọn
                SelectionDependencyType=SelectionDependencyType.RequireSingleObject
            };

            _showNameAction.Execute += _showNameAction_Execute;
            Actions.Add(_showNameAction);
        }

        private void _showNameAction_Execute(object sender, SimpleActionExecuteEventArgs e)
        {
            if(View.GetSingleObject<Product>() is Product product)
            //Nếu đối tượng được chọn khác null, một cách viêt khác cho gọn
            {
            	//hiển thị thông báo tới người dùng
                this.AlertInfo($"Tên sản phẩm:  {product.Name}");
            }
        }
    }
}

Đăng ký ViewController

Như đề cập phần trước, để sử dụng controller này vào phần mềm, bạn cần đăng ký ở Lớp App_Module như sau:

 //Đăng ký những controller sẽ được sử dụng trong phần mềm
        protected override void Register(ModuleControllerService service)
        {
            base.Register(service);
            service.Register<ProductViewController>();
        }
      

Chạy phần mềm

Chỉ vậy thôi, chạy phần mềm ở 3 app, các bạn chọn vào product rồi bấm hiển thị tên, sẽ được kết quả sau:

Windows form


Bố cục cơ bản của lớp App_Module


Bố cục cơ bản của lớp App_Module

Như đã đề cập ở bài Bố cục của 1 solution, App.Module project, đảm nhiệm hầu hết các business logic của một phần mềm bao gồm:

  1. Những thực thể (Entity): bao gồm persistent (có lưu dữ liệu) và NonPersistent (không lưu cơ sở dữ liệu)
  2. Những ViewController/Actions, định nghĩa những hành xử, và dịch vụ để cho người dùng thao tác với dữ liệu.
  3. Báo biểu, Dashboard...
Mặc định của XAF, mỗi khi khai báo một thực thể, ViewController, là phần mềm tự động lấy hết vào. Việc đăng ký không tường minh (implicitly) này có vẻ tiện lợi cho những bạn mới bắt đầu, nhưng nó có thể gây ra những bất tiện:
  1. Mất thời gian khi build:  XAF sẽ tìm tất cả những entity và controller và đăng ký vào hết.
  2. Bất tiện: Ví dụ bạn có 10 Viewcontroller, nhưng ở phiên bản này bạn chỉ có dùng 5. nhưng mặc định nó lấy hết. Nên bạn phải exclude. 
  3. Performance, như ở một bài viết chính XAF đã công bố. Để tăng tốc XAF, chúng ta nên custom ở khoảng này.
Vì thế mọi đối tượng làm việc với YAF, đều được đăng ký tường minh qua các hàm Register().
Mọi việc khởi tạo, đăng ký, chúng ta đều xử lý ở trong file App.Module.cs (lớp App_Module). Cụ thể như sau:

public sealed partial class App_Module : YsvMainModule
    {
        
        public App_Module() => InitializeComponent();
        //icon cho phần mềm
        protected override Icon ProductIcon => Resources.Main;
        //hình ảnh phần mềm
        protected override Image ProductImage => Resources.ProductImage;

        //true: sử dụng kết nối mặc định tới sqlce. Đường dẫn là <Thư mục dự án>/AppDb.sdf (không có mật khẩu). Cả 3 app đều dùng chung cơ sở dữ liệu này.
        //false: dùng ConnectionString được chỉ định trong file config.
        protected override bool UseDefaultSqlCEConnectionString => base.UseDefaultSqlCEConnectionString;
        //Khởi tạo các nhóm quyền mặc đinh. Nhóm quyền admin và user admin (không có mật khẩu)
        public override void InitEmployee(IObjectSpace os)
        {
            YsvUser.InitPermission<Employee>(os);
        }

        //Đăng ký những entities sử dụng trong phần mềm
        protected override void Register(ModuleEntityService service)
        {
            base.Register(service);
            service.Register<Employee>()
                .Register<Product>()
                .Register<AppSettings>();
        }
        // Khởi tạo cấu hình phần mềm
        public override void OnSetupComplete(XafApplication application)
        {
            base.OnSetupComplete(application);
            YsvAppSettings.Init<AppSettings>();
        }
        //Đăng ký ở những view, khi double-click nó sẽ không mở detail view
        protected override void Register(DisableDetailViewService service)
        {
            base.Register(service);
        }
        //Đăng ký những report sẽ sử dụng tron ghệ thống
        protected override void Register(IXtraReportService service)
        {
            base.Register(service);
        }
        //Đăng ký những lớp import dữ liệu từ excel.
        protected override void Register(IExcelImportService service)
        {
            base.Register(service);
        }
        //đăng ký những lớp có điền dữ liệu vào file excel
        protected override void Register(IFillDataToExcelTemplateService service)
        {
            base.Register(service);
        }
        //Đăng ký những controller sẽ được sử dụng trong phần mềm
        protected override void Register(ModuleControllerService service)
        {
            base.Register(service);
        }
    }

Thứ Ba, 16 tháng 3, 2021

Bài 2.a: Tạo và đăng ký một thực thể với YAF

 Bài 2.a: Tạo và đăng ký một thực thể với YAF

Kết quả sau khi đọc bài này

Ở bài này tôi hướng dẫn các bạn tạo và đăng ký một lớp Product. Có thuộc tính:
  1. Name: string 
  2. Price:double
sau đó đăng ký và đưa vào menu.

Tạo lớp Product

  1. Trong thư mục Modules, tạo thư mục con Inventory
  2. Tạo lớp Product.cs
  3. cho lớp thừa kết từ YsvObject
  4. Sử dụng phím tắt như hướng dẫn hoặc các bạn có thể tự gõ 
Bạn có thể sử dụng CodeRush để tạo nhanh như sau:
Tạo thuộc tính tên

Thêm thuộc tính giá


using DevExpress.ExpressApp.DC;
using DevExpress.Persistent.Base;
using DevExpress.Xpo;
using System;
using System.Collections.Generic;
using System.Linq;
using System.Text;
using System.Threading.Tasks;
using YouSoft.Vn.XAFCustom.Core.Entities;
using YouSoft.Vn.XAFCustom.Supports.Attributes;
using YouSoft.Vn.XAFCustom.Supports.Attributes.Validation;

namespace App.Module.Modules.Inventory
{
    //gõ dn và dấu cách
    [XafDisplayName("Hàng hóa")]
    public class Product:YsvObject
    {
        //gõ xps để ra trường tên

        private double _price;
        private string _name;

        [XafDisplayName("Tên")]
        //[ToolTip("")]
        [Size(SizeAttribute.DefaultStringMappingFieldSize)]
        public string Name
        {
            get => _name;
            set => SetPropertyValue(nameof(Name), ref _name, value);

        }
        
        //gõ xpd sẽ ra như bên dưới
        [XafDisplayName("Giá")]
        //[ToolTip("")]
        public double Price
        {
            get => _price;
            set => SetPropertyValue(nameof(Price), ref _price, value);
        }
        public Product(Session session) : base(session)
        {

        }

        public Product()
        {

        }
    }
}
  1. Mở file App.Module.cs thêm đoạn code sau để đăng ký lớp vừa tạo

 protected override void Register(ModuleEntityService service)
        {
            base.Register(service);
            service.Register<Employee>()
                .Register<AppSettings>()
                //vừa thêm ở đây
                .Register<Product>();
        }
        
  1. Build project App.Module
  2. Trong dự án App.Module, double click để mở file Model.DesignedDiffs.xafml
  3. Thêm một mục item vào navigation


  4. Chọn Product ListView:


  5. Chạy project App.Win hoặc App.Web để xem kết quả sẽ như vầy:


    Tên đăng nhập: admin. mật khẩu để trống.


    Video hướng dẫn: https://youtu.be/7u4h-BFqQ9U

Sử dụng Code Rush Template của YAF để code nhanh hơn


Sử dụng YAF CodeRush Templates để code nhanh hơn.

 I . Cài đặt CodeRush  VS 2019

    Vào menu: Extensions>>Manage>>Extensions >> Online >>CodeRush


II. Thêm thư viện YouSoft.vn.

   Mở CodeRush
   Code Templates>>Templates >>DevEx>>Import Templates  


Import hết những file sau:

Clips


 Các phím tắt

Ngoài các phím tắt cơ bản của Code Rush, YAF còn nhiều phím tắt đặc trưng khác:
  1. cfb => CaptionsForBoolValues
  2. def => tạo thông tin mặc định cho một lớp Entity
  3. dn => [XafDisplayName()]
  4. fn0=> hiển thị property số không số lẻ
  5. fn1=>hiển thị property số 1 số lẻ
  6. fn2=>hiển thị property số 2 số lẻ
  7. nb=>[Browsable(false)]
  8. ndv=>[VisibleInDetailView(false)]
  9. ne => không cho edit property
  10. nllv=>ẩn property trong Lookup list view
  11. nlv=>ẩn property trong List View
  12. np=> NonPerssitent Attribute
  13. pcode=> tạo property code với các tiện ích.
  14. pname=>tạo property Name với index, required
  15. ros => property bắt buộc khi lưu
  16. yc => tạo một entity mới
  17. tt=> Tạo tool tips


Bài 1: Bắt đầu với YAF

 Bài 1: BẮT ĐẦU VỚI YAF

Để bắt đầu với YAF, bạn cần làm những việc sau đây:

CÀI ĐẶT CHUNG

  1. Cài DevExpress bản universal (mua hoặc trial) mới nhất (hiện tại là 20.2.6).
  2. Cài .Net Framework 4.8 (dành cho dự án .net) 
  3. Cài SqlCE 4.0 (cơ sở dữ liệu mặc định)

CHẠY BLAZOR

  1. Cài Visual studio 2019 bản mới nhất.
  2. Cài .Net 5 SDK. Lưu ý chọn trong khu vực SDK


CLONE PROJECTS TỪ YOUSOFT VIỆT NAM

  1. Clone thư viện YAF:
    git clone https://tmsnhien@bitbucket.org/tmsnhien/yousoft.vn.git
  2. Clone Dự án mẫu:
    1. Dự án chỉ chạy .Net framework: 
      git clone https://tmsnhien@bitbucket.org/tmsnhien/.netframework_guid_project.git
    2. Dự án chạy .netstandard (module), .Net5 (Blazor)
      git clone git clone https://tmsnhien@bitbucket.org/tmsnhien/.netcore_guid_project.git


CHẠY DỰ ÁN

Chạy 1 trong 2 dự án trên, với web, win hoặc blazor các bạn sẽ thấy tương tự như bài
Chúc các bạn thành công.


Cấu trúc 1 solutions YAF

 CẤU TRÚC 1 SOLUTION YAF

Cấu trúc 1 solution YAF


Cấu trúc một solution sử dụng YAF đơn giản hơn 1 solution của XAF. Bao gồm:

  • App.Module: Project này dùng để định nghĩa các Enitty, controller cho dự án. Dự án này có thể là:
    • .net framework project: chỉ tích hợp chạy winform và web form. 
    • .NetStandard project: có thể tích hợp chạy trên Blazor và Winform bản mới sau này. Hiện tại (2021/03/16), .net standard module còn hạn chế không thể design trực tiếp các mục sau (chỉ có thể viết trong code):
      • Design reports
      • Design controllers
      • Design form.
  • App.Win: điều chỉnh cho phần mềm chạy winform.
    Kết quả sau khi chạy:


  • App.Web: điều chỉnh cho phần mềm chạy web.


  • App.BlazorServer: điều chỉnh chạy trên nền Blazor server.